In this comprehensive tutorial, we’ll implement a “Load More” functionality in Laravel 12 using jQuery AJAX. We’ll cover:
- Creating a posts table via migration
- Setting up a Post model and factory
- Generating test data
- Implementing dynamic loading with AJAX
Prerequisites
Before we begin, ensure you have:
- Laravel 12 installed
- MySQL database configured
- Basic Laravel knowledge
Step 1: Configure Database
First, set up your MySQL connection in the .env file:
DB_CONNECTION=mysql
DB_HOST=127.0.0.1
DB_PORT=3306
DB_DATABASE=your_database_name
DB_USERNAME=your_username
DB_PASSWORD=your_password
Step 2: Create Posts Migration
Generate and run the migration for our posts table:
php artisan make:migration create_posts_tableAdd the schema to database/migrations/[timestamp]_create_posts_table.php:
Schema::create('posts', function (Blueprint $table) {
    $table->id();
    $table->string('title');
    $table->string('slug');
    $table->text('body');
    $table->timestamps();
});
Run the migration:
php artisan migrateStep 3: Create Post Model
Create app/Models/Post.php:
<?php

namespace App\Models;

use Illuminate\Database\Eloquent\Factories\HasFactory;
use Illuminate\Database\Eloquent\Model;

class Post extends Model
{
    use HasFactory;

    protected $fillable = ['title', 'body', 'slug'];
}
Step 4: Generate Test Data with Factory
Create a factory:
php artisan make:factory PostFactory --model=PostConfigure database/factories/PostFactory.php:
public function definition(): array
{
    return [
        'title' => $this->faker->text(),
        'slug' => Str::slug($this->faker->text()),
        'body' => $this->faker->paragraph()
    ];
}
Generate 20 test posts:
php artisan tinker
Post::factory()->count(20)->create()
Step 5: Set Up Routes
Add to routes/web.php:
use App\Http\Controllers\PostController;

Route::get('posts', [PostController::class, 'index'])->name('posts.index');
Step 6: Create Controller
Generate PostController:
php artisan make:controller PostControllerImplement the index method:
public function index(Request $request)
{
    $posts = Post::paginate(10);

    if ($request->ajax()) {
        return response()->json([
            'html' => view('data', compact('posts'))->render()
        ]);
    }

    return view('posts', compact('posts'));
}
Step 7: Create Views
Main View (resources/views/posts.blade.php)
<!DOCTYPE html>
<html lang="{{ str_replace('_', '-', app()->getLocale()) }}">
<head>
<meta charset="UTF-8">
<meta name="viewport" content="width=device-width, initial-scale=1.0">
<meta name="csrf-token" content="{{ csrf_token() }}">
<title>Laravel 12 Load More Data</title>
<link href="https://cdn.jsdelivr.net/npm/bootstrap@5.3.0/dist/css/bootstrap.min.css" rel="stylesheet">
</head>
<body>
<div class="container mt-5">
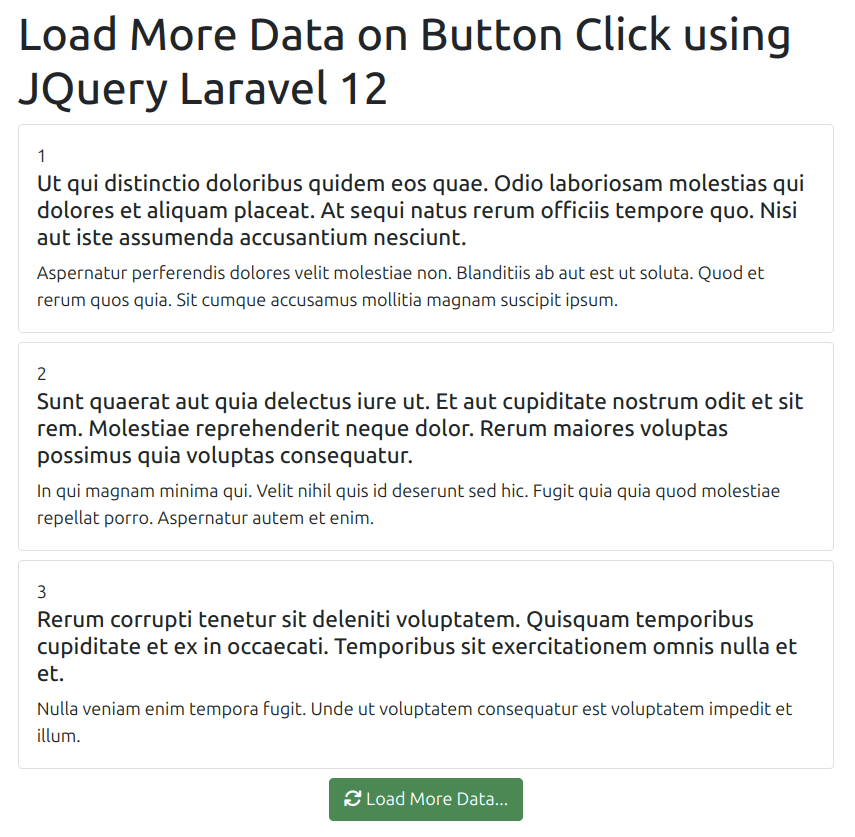
<h1 class="mb-4">Posts</h1>
<div id="data-wrapper">
@include('data')
</div>
<div class="text-center my-4">
<button class="btn btn-primary load-more-data">
Load More Posts
</button>
</div>
<div class="auto-load text-center" style="display: none;">
<!-- Loading spinner SVG -->
</div>
</div>
<script src="https://code.jquery.com/jquery-3.6.0.min.js"></script>
<script>
$(document).ready(function() {
var page = 1;
var loading = false;
$('.load-more-data').click(function() {
if (!loading) {
loadMoreData(++page);
}
});
function loadMoreData(page) {
loading = true;
$('.auto-load').show();
$.ajax({
url: '{{ route("posts.index") }}?page=' + page,
type: 'get',
success: function(response) {
if (response.html) {
$('#data-wrapper').append(response.html);
} else {
$('.load-more-data').prop('disabled', true)
.text('No more posts available');
}
},
complete: function() {
loading = false;
$('.auto-load').hide();
}
});
}
});
</script>
</body>
</html>Data Partial (resources/views/data.blade.php)
@foreach($posts as $post)
    <div class="card mb-3">
        <div class="card-body">
            <h5 class="card-title">{{ $post->title }}</h5>
            <p class="card-text">{{ $post->body }}</p>
            <small class="text-muted">Slug: {{ $post->slug }}</small>
        </div>
    </div>
@endforeach
Step 8: Run the Application
Start the development server:
php artisan serveVisit http://localhost:8000/posts in your browser to see the implementation.