In today’s digital economy, accepting online payments is crucial for any web application. Razorpay has emerged as one of India’s leading payment gateway solutions, offering businesses a seamless way to process transactions. Founded in 2014, Razorpay supports multiple payment methods including credit/debit cards, net banking, UPI, and popular digital wallets.
In this comprehensive tutorial, I’ll walk you through integrating Razorpay into your Laravel 12 application. We’ll create a simple payment flow where users can click a “Pay 10 INR” button and receive confirmation upon successful transaction.
Prerequisites
Before we begin, ensure you have:
- PHP installed on your system
- Composer for dependency management
- Basic knowledge of Laravel framework
Step 1: Setting Up Laravel 12
If you haven’t already created your Laravel project, run the following command in your terminal:
composer create-project laravel/laravel razorpay-demoThis creates a fresh Laravel installation named “razorpay-demo”.
Step 2: Creating a Razorpay Account
To use Razorpay’s services, you’ll need:
- Visit Razorpay’s website and sign up for an account
- After registration, navigate to the API Keys section in your dashboard
- Copy your Key ID and Key Secret

Add these credentials to your Laravel .env file:
RAZORPAY_KEY=rzp_test_XXXXXXXXX
RAZORPAY_SECRET=XXXXXXXXXXXXXXXX
Step 3: Installing the Razorpay Package
Laravel makes it easy to integrate third-party packages. Install the official Razorpay PHP SDK with:
composer require razorpay/razorpayStep 4: Configuring Routes
Next, we’ll set up routes for our payment flow. Add these to your routes/web.php:
<?php

use Illuminate\Support\Facades\Route;
use App\Http\Controllers\RazorpayPaymentController;

Route::get('razorpay-payment', [RazorpayPaymentController::class, 'index']);
Route::post('razorpay-payment', [RazorpayPaymentController::class, 'store'])->name('razorpay.payment.store');
Step 5: Creating the Payment Controller
Generate a new controller to handle payment logic:
php artisan make:controller RazorpayPaymentControllerHere’s the complete controller code:
<?php

namespace App\Http\Controllers;

use Illuminate\Http\Request;
use Razorpay\Api\Api;
use Exception;
use Illuminate\View\View;
use Illuminate\Http\RedirectResponse;

class RazorpayPaymentController extends Controller
{
    /**
     * Display payment page
     */
    public function index(): View
    {
        return view('razorpay');
    }

    /**
     * Process payment
     */
    public function store(Request $request): RedirectResponse
    {
        $input = $request->all();

        $api = new Api(env('RAZORPAY_KEY'), env('RAZORPAY_SECRET'));

        $payment = $api->payment->fetch($input['razorpay_payment_id']);

        if(!empty($input['razorpay_payment_id'])) {
            try {
                $response = $api->payment->fetch($input['razorpay_payment_id'])
                                       ->capture(['amount'=>$payment['amount']]);

            } catch (Exception $e) {
                return redirect()->back()
                               ->with('error', $e->getMessage());
            }
        }

        return redirect()->back()
                       ->with('success', 'Payment successful');
    }
}
Step 6: Designing the Payment View
Create a new Blade file at resources/views/razorpay.blade.php:
<!DOCTYPE html>
<html>
<head>
<meta charset="utf-8">
<meta name="viewport" content="width=device-width, initial-scale=1">
<title>Laravel - Razorpay Payment Gateway Integration</title>
<script src="https://cdnjs.cloudflare.com/ajax/libs/jquery/3.6.0/jquery.min.js"></script>
<link href="https://cdn.jsdelivr.net/npm/bootstrap@5.0.2/dist/css/bootstrap.min.css" rel="stylesheet">
</head>
<body>
<div class="container">
<div class="card mt-5">
<h3 class="card-header p-3">Razorpay Payment Gateway Integration</h3>
<div class="card-body">
@session('error')
<div class="alert alert-danger" role="alert">
{{ $value }}
</div>
@endsession
@session('success')
<div class="alert alert-success" role="alert">
{{ $value }}
</div>
@endsession
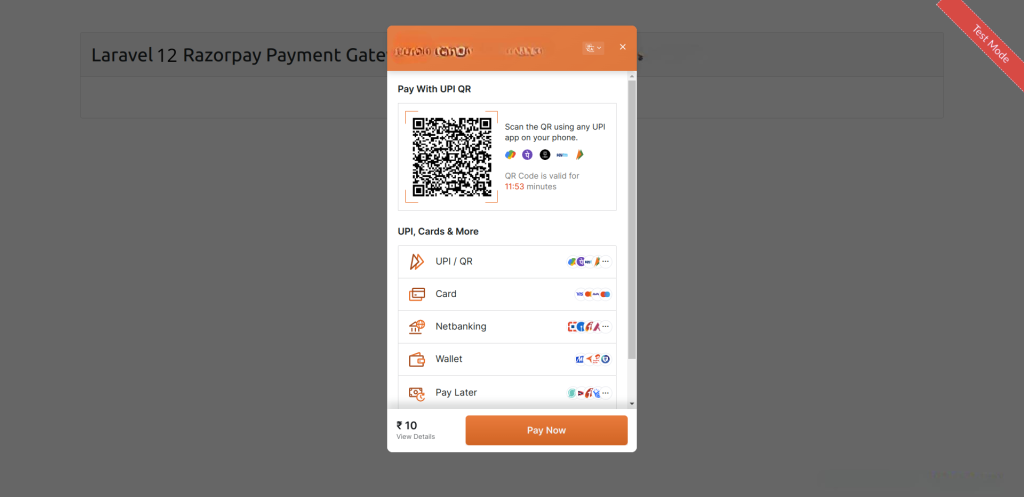
<form action="{{ route('razorpay.payment.store') }}" method="POST" class="text-center">
@csrf
<script src="https://checkout.razorpay.com/v1/checkout.js"
data-key="{{ env('RAZORPAY_KEY') }}"
data-amount="1000"
data-buttontext="Pay 10 INR"
data-name="My Laravel App"
data-description="Test Transaction"
data-image="https://example.com/your_logo.png"
data-prefill.name="Customer Name"
data-prefill.email="customer@example.com"
data-theme.color="#ff7529">
</script>
</form>
</div>
</div>
</div>
</body>
</html>Running the Application
Start your development server with:
php artisan serveVisit http://localhost:8000/razorpay-payment in your browser to test the integration.
Customization Tips
- Amount: Change the data-amount value (in paise) for different payment amounts
- Styling: Modify the Bootstrap classes to match your application’s design
- Success Handling: Extend the success handler to update your database or send confirmation emails
Security Considerations
- Never expose your Razorpay secret key in client-side code
- Always use HTTPS for production implementations
- Implement proper validation and error handling