In this tutorial, we’ll demonstrate how to implement custom validation error messages in a Laravel 12 application.
Laravel provides a convenient Request object for form validation. We’ll use the validate() method to define validation rules and custom error messages, then display them using the $errors variable. Follow this step-by-step guide to set up form validation in Laravel 12.
Steps to Implement Form Validation in Laravel 12
Step 1: Install Laravel 12
(Skip this step if you already have a Laravel project.)
Run the following command to create a new Laravel project:
composer create-project laravel/laravel example-appStep 2: Create a Controller
We’ll create a FormController with two methods:
- create() → Displays the form
- store() → Handles form submission and validation
Run the command:
php artisan make:controller FormControllerUpdate the controller with the following code:
app/Http/Controllers/FormController.php
<?php

namespace App\Http\Controllers;

use Illuminate\Http\Request;
use App\Models\User;
use Illuminate\View\View;
use Illuminate\Http\RedirectResponse;

class FormController extends Controller
{
    /**
     * Display the user creation form.
     */
    public function create(): View
    {
        return view('createUser');
    }

    /**
     * Store a new user with validation.
     */
    public function store(Request $request): RedirectResponse
    {
        $validatedData = $request->validate([
            'name' => 'required',
            'password' => 'required|min:5',
            'email' => 'required|email|unique:users'
        ], [
            'name.required' => 'The name field is required.',
            'password.required' => 'The password field is required.',
            'email.required' => 'The email field is required.',
            'email.email' => 'The email must be a valid address.'
        ]);

        $validatedData['password'] = bcrypt($validatedData['password']);
        User::create($validatedData);

        return back()->with('success', 'User created successfully!');
    }
}
Step 3: Define Routes
Add the following routes in routes/web.php:
<?php

use Illuminate\Support\Facades\Route;
use App\Http\Controllers\FormController;

Route::get('users/create', [FormController::class, 'create']);
Route::post('users/create', [FormController::class, 'store'])->name('users.store');
Step 4: Create the Blade View
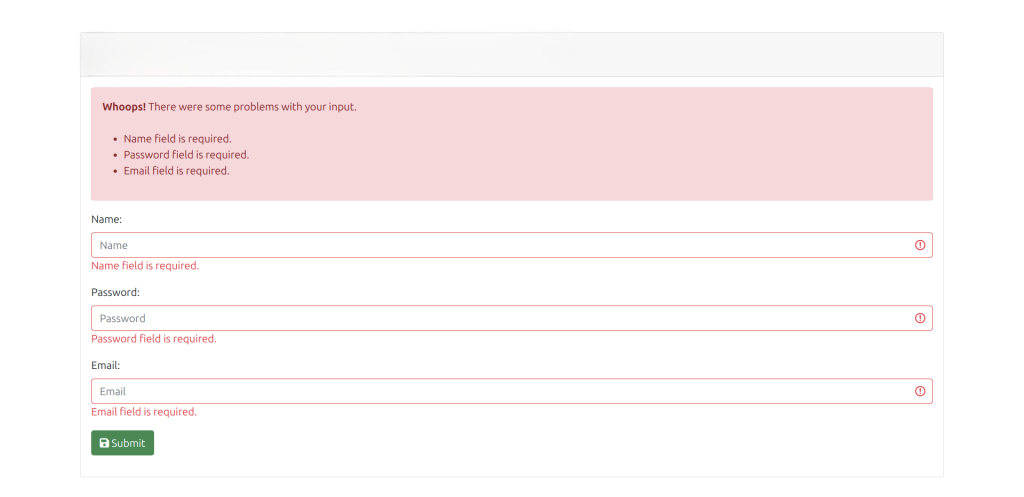
We’ll create a Bootstrap-styled form with three different ways to display validation errors.
resources/views/createUser.blade.php
<!DOCTYPE html>
<html>
<head>
    <title>Laravel 12 Form Validation Example</title>
    <link href="https://cdn.jsdelivr.net/npm/bootstrap@5.0.2/dist/css/bootstrap.min.css" rel="stylesheet">
    <link rel="stylesheet" href="https://cdnjs.cloudflare.com/ajax/libs/font-awesome/6.5.1/css/all.min.css" />
</head>
<body>
    <div class="container">
        <div class="card mt-5">
            <h3 class="card-header p-3">
                <i class="fa fa-star"></i> Laravel 12 Form Validation Example
            </h3>
            <div class="card-body">
                <!-- Success Message -->
                @session('success')
                    <div class="alert alert-success">
                        {{ $value }}
                    </div>
                @endsession

                <!-- Method 1: Display All Errors -->
                @if ($errors->any())
                    <div class="alert alert-danger">
                        <strong>Error!</strong> Please fix the following:
                        <ul>
                            @foreach ($errors->all() as $error)
                                <li>{{ $error }}</li>
                            @endforeach
                        </ul>
                    </div>
                @endif

                <form method="POST" action="{{ route('users.store') }}">
                    @csrf

                    <!-- Name Field -->
                    <div class="mb-3">
                        <label class="form-label">Name:</label>
                        <input
                            type="text"
                            name="name"
                            class="form-control @error('name') is-invalid @enderror"
                            placeholder="Enter name">
                        @error('name')
                            <span class="text-danger">{{ $message }}</span>
                        @enderror
                    </div>

                    <!-- Password Field -->
                    <div class="mb-3">
                        <label class="form-label">Password:</label>
                        <input
                            type="password"
                            name="password"
                            class="form-control @error('password') is-invalid @enderror"
                            placeholder="Password (min: 5 chars)">
                        @if ($errors->has('password'))
                            <span class="text-danger">{{ $errors->first('password') }}</span>
                        @endif
                    </div>

                    <!-- Email Field -->
                    <div class="mb-3">
                        <label class="form-label">Email:</label>
                        <input
                            type="email"
                            name="email"
                            class="form-control @error('email') is-invalid @enderror"
                            placeholder="Enter email">
                        @error('email')
                            <span class="text-danger">{{ $message }}</span>
                        @enderror
                    </div>

                    <button type="submit" class="btn btn-success">
                        <i class="fa fa-save"></i> Submit
                    </button>
                </form>
            </div>
        </div>
    </div>
</body>
</html>
Step 5: Run the Application
Start the Laravel development server:
php artisan serveVisit the form in your browser:
🔗 http://localhost:8000/users/create